This image was captured between August 28th and September 1st and it cost me under $100 from start to finish. Really. :)
I will freely admit that I'm no astronomer. I have a college-level astronomy book on my desk that I've attempted to read four times. Each time, I'm asleep in my chair in the first pages.
But that's how I am. I learn by doing, anyway.
(I'm not sure if learning-by-doing is more or less expensive than the college approach, my experiments have been costly!)
The first time that I put my eye to a telescope, I remember it well. There was nothing in the eyepiece. I was youngish and the adult I was with, who set up the telescope was cussing, frustrated that we just couldn't seem to see anything with the thing. He put it in the closet and started to frustratedly suck down a cigarette and complain. We didn't try again with that telescope.
Then, as an adult, I broke down and bought a used telescope (an Orion 8inch Newtonian Reflector). It was about the size of a cannon and it came with a small treasure trove of accessories, (and no instructions) and so I had no idea what I was doing. But, I did get it pointed to some easy stuff.
The moon. Jupiter. Saturn. Orion Nebula.
I wasn't very smart about it. Like, with the moon. I just kept staring at it, unfiltered. You know, that the moon-glow is a reflection of the Sun and the sun can blind you, right? Little blue bars floated in and out of my vision for days.
The one that struck me the most, was Saturn. Those rings absolutely capture the imagination. I thought two things:
"I really need to show this to people!" and "I want to go there!'
.. and that's how you get into Astrophotography. To fulfill that 1st impulse of trying to find some way to capture what you see in the eyepiece in a way that can be easily shared.
The problem, as I see it, is that Astronomy is entirely too close to rocket science in terms of complexity. Especially astro-photography.
In "True Bill Fashion", I put my wallet before my brain and started ordering stuff. The first bit was a solar system imager from Orion, a GoTo Conversion system for my Orion Mount and a bunch of adapters that never seemed to work correctly. In fact, you could say none if it really worked right. I had duct tape (literally) folded as wedges to align the camera to look into the eyepiece (that is called eyepiece-projection).
I did still get some pretty-cool images, though, albeit at a low resolution.
About a decade has gone by and I'm still no astronomer. But I have figured some things out and technology and product offerings have evolved to make our astro-photography aspirations easier. I'm still working on the "I really need to show this to people!" part, maybe I can get to the "I want to go there!" part in a couple years.. :)
I will not be getting super-ultra-technical here. I'm just going to cover some fundamentals and what I've found works for capturing images of the awesome things in our night sky.
Astrophotography Approaches
Want to make astro-images? You basically have two options.
Buy a bunch of stuff
or
Rent someone else's awesome gear
___
Rentals
Part Robot, Part Telescope.
A couple years ago I was involved in this marketing project and was asked to produce an image of a Galaxy (any Galaxy), something with an unlimited use commercial license. I think it went up as some wall-hanger in an airport with some cheesy slogan for a product, "A Galaxy of Options." or some crap. Anyway, NDA's prevent me from being more specific than that.
I didn't have access to an appropriate deep-sky telescope and didn't have the $5k built into the budget to come up with everything I needed in a hurry. I found this guy in Europe with an Observatory and Imaging gear, via an Astronomy forum. For a small fee, he allowed me to VNC (remote control) into his Observatory PC and run the imager from remote. The imager had a 3 megapixel array and I ended up shooting about 100 + frames, combining them all into a stacker to get the resolution I needed for print. It worked well! (Well, I guess it did, I got paid.)
So, that's what Renting usually looks like. Instead of the borrow-lenses approach of getting a lens in the mail, renting a telescope usually involves renting observatory time, either local or remotely controlled. It is because the capabilities of the mount are as important as the optics of the scope and these mounts aren't easily shippable and aren't cheap.
Within 300 miles of me there are about a half-dozen observatories, most built by universities. Most, you can get some time with even if you aren't a student. Only a few of those have research-grade deep sky equipment and imaging configurations. A few are 'observe only' and none of them really let you bring a camera to pair up with b/c of the delicate balance configuration on the mounts.
The few observatories, in Alabama - near me are in somewhat light-polluted areas or the telescope of the observatory is of less quality than that which you can pick up on Craigslist for less than $1k.
So, for me the option is more between remotely controlling better equipment for imaging or using my own. There are a couple services out there to provide this and even individual observatories can often accommodate this.
One cool service, used to be called Global-Rent-A-Scope. Which, I guess is now called iTelescope.Net. With iTelescope.Net you can browse available telescopes and connect to them in real-time through a simple-enough web interface.

Each telescope has it's own host on the itelescope.net domain and an easy-enough http interface from which you can submit imaging jobs and monitor their status.
It's really just as simple as clicking one, submitting an imaging job and picking your TiFF files up from an FTP site. The service allows you to reserve a telescope, pre-define imaging runs and execute those imaging runs as 'jobs'. You can monitor the status and the billing seems to be quite fair.

Each telescope has it's own host on the itelescope.net domain and an easy-enough http interface from which you can submit imaging jobs and monitor their status.
Telescopes are billed by varied rates per imaging hour. You only pay for your imaging time, so the time it takes for the telescope to slew to a location and do imaging setup isn't included. They manage profiles containing the capabilities of the individual telescopes so that you can pick the right tool for the job. In fact, picking from the smorgasbord of awesome offerings is way harder than the actual imaging!
They sell subscriptions with a base number of imaging-points included and offer the ability to purchase add-on points.
Why is it a subscription? Well, if you think about it, you will be in and out of their servers quite a bit before-or-after your actual imaging run, so this small subscription rate covers the usage of their servers and the short-term storage of your image data. I've found the billing arrangement to be very fair and you can cancel at any time. I even had a job go wrong (the telescope used the wrong filter) and a simple request form and they refunded the points used without question.
Example pricing at the time of this article, I shot 5 frames of Andromeda @ 10 minutes per frame. That came out to be about $60 to produce the one image. It may seem alot for one image but considering you are getting control of a $100k research-grade telescope and imager, it's a good deal.
There are other services, as well. Slooh.Com, Bradford Robotic Telescope and others. Check that the one you choose for the image-use rights and resolution that meets your needs.
iTelescope.net met mine, I've maintained a subscription for over a year (since I discovered them)
If you still think that's too much, consider what it would cost you to do it yourself, with lesser-gear.. Even the cheaper routes,... aren't cheap..
Buy a Bunch of Stuff
Because, my next home will be purchased entirely on American Express Reward Points.
In the (inner) Solar System? That's easy!
So, what you need depends on what you want to do. If you want to photograph inner solar-system objects, pretty much any decent telescope and mount will do. To alleviate frustration, I would recommend something with a GoTo - or equivalent -mount. (The little handheld dealio that finds objects in the sky for you!) The Meade ETX 125 Schmidt-Cassegrain served me well for years. One can be had for around $400 or less if you get lucky on eBay / Craigslist. I'm using a Celestron NexStar 8SE now, I like it better but both were very good.
If you aren't afraid to point objects yourself, a Newtonian or Dobsonian reflector works well. There is an 8" dobsonian on craigslist near me in Fairhope, Alabama right now for $125, that's a pretty common price.
As an imager, you can do something janky like putting web-cam guts into an old telescope eyepiece.
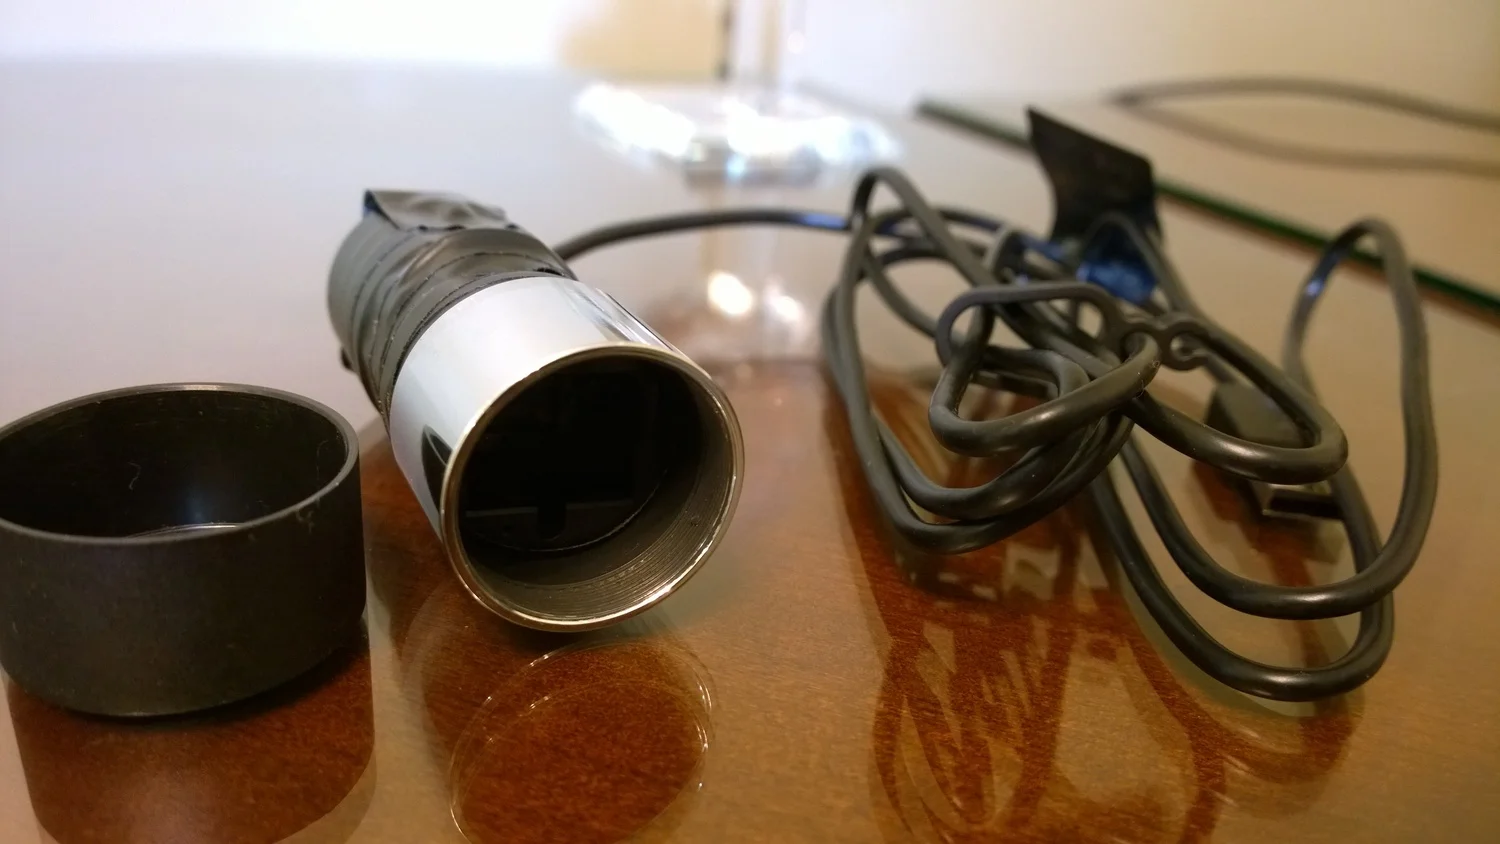
A Microsoft Web Cam was harmed in the making of this astro-imager.
Or, simply use your smart phone. Stick the cameraphone up to the eyepiece and click-away until you get something usable!
They make cellphone holders that bolt onto an eyepiece and then hold your cameraphone up to the eyepiece for steadier shots. Use your time-delayed shutter and try to slightly underexpose to keep your shutter speed fast, then boost in post.

The Nokia Lumia 1020 has a 40-ish megapixel sensor and shoots RAW. A great little tool for planetary and solar system imaging. Sure there is image noise but whatever, we have good software to work that out. These days, I use an iPhone 6. You don't get RAW files but it doesn't matter - the results are still quite good.
They even make filters you can put over a telescope to allow you to look at the sun! (Do not try this without the filter!! The light coming from the unfiltered eyepiece is enough to burn you or start a fire, so it would easily blind you instantly.)
Deep-sky stuff, that's a littler harder.
For deep sky, it becomes a photon-race. How much light can you collect in the sky before the stars start to stretch? Well that depends on your aperture (and the steadiness of your mount)
The telescope you need for deep sky astrophotography is the highest aperture you can afford. Just like terrestrial photography :)
There are refractors, which are lens-based and reflectors, which are mirror-based and all sorts of opinions as to "which is best" vs "which is best - for the money".
I find an 8" Schmidt-Cassegrain to be the best middle-of-the road for planetary and deep sky objects, for the money, so long as you can find a dark enough observing location and providing you have the right mount. An 8" SCT in the $500-$800-ish price range will boast an impressive 2000mm focal length with a somewhat disappointing f10 optics, which means you will need longer exposure or a focal reducer (probably both).
Our planet is spinning (and wobbling) and the solar system is spinning (and wobbling) so all of this spinning and wobbling will result in not-so-sharp stars in exposures over 20-30 seconds @ f10. A focal reducer can buy you an effective aperture of f6.3 @ 1260mm focal length. These cost less than $100.00, so umm.. worth it.
Okay, I said I wasn't going to get technical and that was a bit technical, so lets just say that the lower the f number, the better, even with a reduced magnification on the scope.
So, to get deep space objects in exposures over 30 seconds, you will need:
An Equatorial Mount w/ Automatic Tracking and Auto guider Support
A secondary, smaller guidescope mounted atop your primary scope
An Auto-guider
A laptop (unless the auto guider is standalone)
A camera or CCD capable of 'bulb' mode or long exposures
Image-Processing Software
For my setup, when using a DSLR as the imager, the setup looks like this:

When imaging with a CCD imager (I'm using a QHY 11, for the time being), my setup looks like this:

The big boy observatories use CCD imaging platforms that have an effective iSO Sensitivity of 20,000+ with very low noise but they are usually also low resolution. They are liquid cooled specialty astronomy monsters. These are usually monochrome cameras. Color is achieved through RGB Recombination of frames shot with color filters that ride on filter wheels. (That's the circular disc between the diagonal and the main imager in the photo above.)
K, so that bit was a bit technical too but the gist here is if you shoot a three shots through special filters, one w/ a green filter, one w/ a red filter and one with a blue filter, you can basically build a color image in photoshop or stacking software. For the image on this post, I went the easy route in photoshop by simply copy and pasting each frames into the respective RGB channels. No Stacking software was used.
Some folks have a DSLR body outfitted with specialty sensors that have been modified to make them more astro-photography friendly.
I haven't tried it (yet) but I'm betting the Sony A7s would be a great imaging platform for astrophotography. My A7R has been a trooper so far.
Once you have all of this stuff, the general operation looks something like this:
- You align the telescope mount for 'polar alignment' to keep from star field rotation. You are basically aligning the mount with the Celestial Pole (Polaris) -- the hand controller walks you through it.
- You 'star-align' your mount to some guide stars used by the system to orient itself in space.
- Then you pick on the hand controller, "go to -> M31" and the telescope slews to the right coordinates.
- Your camera gets attached to the telescope viewport
- You focus the telescope
- You use the auto-guider scope and software to choose a guide star.
- You enable auto-guiding on the scope. The auto guider then locks in the direction and uses the guide star motion to keep the mount locked onto a star for long periods of time.
- You shoot long exposures, 5, 10, 20 minutes at deep sky objects. Shoot lots of them.
- You combine those images in a photo stacker software. Some frames for luminance, some to rebuild the colors. (If shot in mono with a filter wheel)
- Boom. You've made a picture of deep sky objects :)
At the end of the day, through persistence, with a setup like this and a good observation location you can use a DSLR or other non - astrophotography imager (probably still using filters though) to come up with some very high quality images, comparable - to those you get from a remote specialty observatory.
Conclusion
It is time consuming & expensive but a great hobby and a fantastic way to learn more about the Cosmos. I've found myself lately, relegating the backyard viewing to observation or Solar-System photography and using the remote observatories for Deep Sky Stuff. My mount's interaction with the auto guider have been persnickety and somewhat detracts from what should otherwise be an enjoyable experience.
There is absolutely nothing wrong with the observatory route, either. In the resulting images, the differences in your work will come through in your choice of time-of-day, observation location and post-processing characteristics. PS, Some of the best work I've ever seen, like the amazing work over at http://www.robgendlerastropics.com/ (my muse in this realm of photography) - most of which has come from observatory work!
In the October-December Winter Months, Andromeda is high and clear in our sky in reasonable parts of the evening. Orion starts to make an appearance as well. In the late winter and early spring, Saturn and Jupiter come back around in our sky, so that's always exciting. In the clearer months here on the Gulf Coast I plan on spending some time astro-imaging with my own gear and you are welcome to join me for in an outing. Just leave a comment or drop me an email at bill.dodd@graffitilogic.com and lets do some star photography!

Clear skies and broad horizons...